
Introduction to Coconut Dome with Chocolate Spread
Every family has that one dessert that seems to disappear before it even reaches the table. For mine, it’s undoubtedly the Coconut Dome with Chocolate Spread. This delectable treat has a unique way of bringing everyone together—whether it’s during a holiday meal or a casual weekend gathering. The fluffy coconut exterior hugs a rich, fudgy chocolate spread center, creating a delightful contrast that’s both sweet and satisfying.
What makes this dessert a standout? It's not just the sensational taste. The Coconut Dome with Chocolate Spread is quite simple to make, requiring only a handful of ingredients that you might already have in your pantry. Plus, kids love to be involved in the preparation process! Each step—from mixing the coconut to it being shaped into a dome—brings joy and excitement, connecting generations through shared memories and experiences.
Bringing this delightful dome to a gathering is sure to be a crowd-pleaser. Have you ever seen a room light up when someone slices into a dessert revealing a luscious chocolate center? If you're looking to elevate your dessert game and create lasting memories with your loved ones, this recipe is just what you need. For more inspiration, check out this article on dessert trends and see how you can make your celebrations even sweeter!

Ingredients for Coconut Dome with Chocolate Spread
Creating a delightful Coconut Dome with Chocolate Spread is all about quality ingredients that come together to form an irresistible treat. Here’s what you'll need to gather:
- 3 cups desiccated coconut: This is the star ingredient, providing that tropical flavor and texture.
- 1 cup powdered sugar: For a touch of sweetness without the graininess of granulated sugar.
- ½ cup butter, softened: You want this creamy to help bind everything together.
- 3 tablespoons milk: Adds moisture and helps achieve the perfect consistency for molding.
- 1 teaspoon vanilla extract: A splash of vanilla elevates the flavor profile beautifully.
- 1 pinch of salt: Just a hint to enhance the sweetness.
- 1 cup chocolate spread (hazelnut or dark chocolate): The gooey center that makes every bite magical.
- Extra desiccated coconut for dusting: For that lovely snowy effect on the surface.
- Plastic wrap for lining the bowl: Essential for easy unmolding.
Make sure to use high-quality ingredients, as they really make a difference in the taste. If you're looking for organic coconut or artisanal chocolate spreads, check out local health food stores or online retailers like Thrive Market for fantastic options.
Now that you know what to gather, let's dive into the delicious steps to create this enchanting dessert!
Step-by-step Preparation of Coconut Dome with Chocolate Spread
Creating a Coconut Dome with Chocolate Spread might just become your new favorite dessert project! With its delightful layers and rich flavor, you’ll see why it’s a cherished option for gatherings and special occasions. Let’s break it down into fun and manageable steps.
Gather Your Materials
Before diving into the delicious world of coconut domes, it’s essential to gather your materials. Here’s what you’ll need:
- 3 cups desiccated coconut
- 1 cup powdered sugar
- ½ cup softened butter
- 3 tablespoons milk
- 1 teaspoon vanilla extract
- A pinch of salt
- 1 cup chocolate spread (choose your favorite!)
- Extra desiccated coconut for dusting
- Plastic wrap for lining the bowl
Make sure you have a medium-sized round bowl (around 1.5 liters) ready to use as your mold.
Prepare Your Bowl
Begin by lining your round bowl with plastic wrap. This is a crucial step since it will allow you to easily pop out your dome later. Let the edges hang over the sides—this will act like a handle when you’re ready to unmold your creation!
Mix the Coconut Base
In a large mixing bowl, combine the desiccated coconut, powdered sugar, and a pinch of salt. Next, add the softened butter, milk, and vanilla extract. Use your hands or a wooden spoon to mix these ingredients until they form a soft and moldable dough. It should stick together nicely when you press it—this ensures your dome holds its shape!
Shape the Dome
Now, it’s time to press about two-thirds of your coconut mixture firmly into the prepared bowl. Make sure you’re creating a thick layer that covers the entire interior. Pay attention to those edges to ensure there are no gaps—this will become the lovely outer shell of your dome.
Add the Chocolate Center
Spoon your chosen chocolate spread into the center cavity you’ve created, smoothing it out evenly. You’ll want to leave about an inch of space at the top to seal it later, so don’t overfill!
Seal with Coconut
With the remaining coconut mixture, cover the chocolate layer thoroughly, pressing gently but firmly to form a complete dome. Aim for a smooth surface—it’ll make your finished dessert look incredibly inviting.
Chill
Cover the top with the hanging edges of the plastic wrap and pop it into the refrigerator for at least four hours or, better yet, overnight. This helps the coconut dome firm up beautifully, making it easier to unmold.
Unmold and Decorate
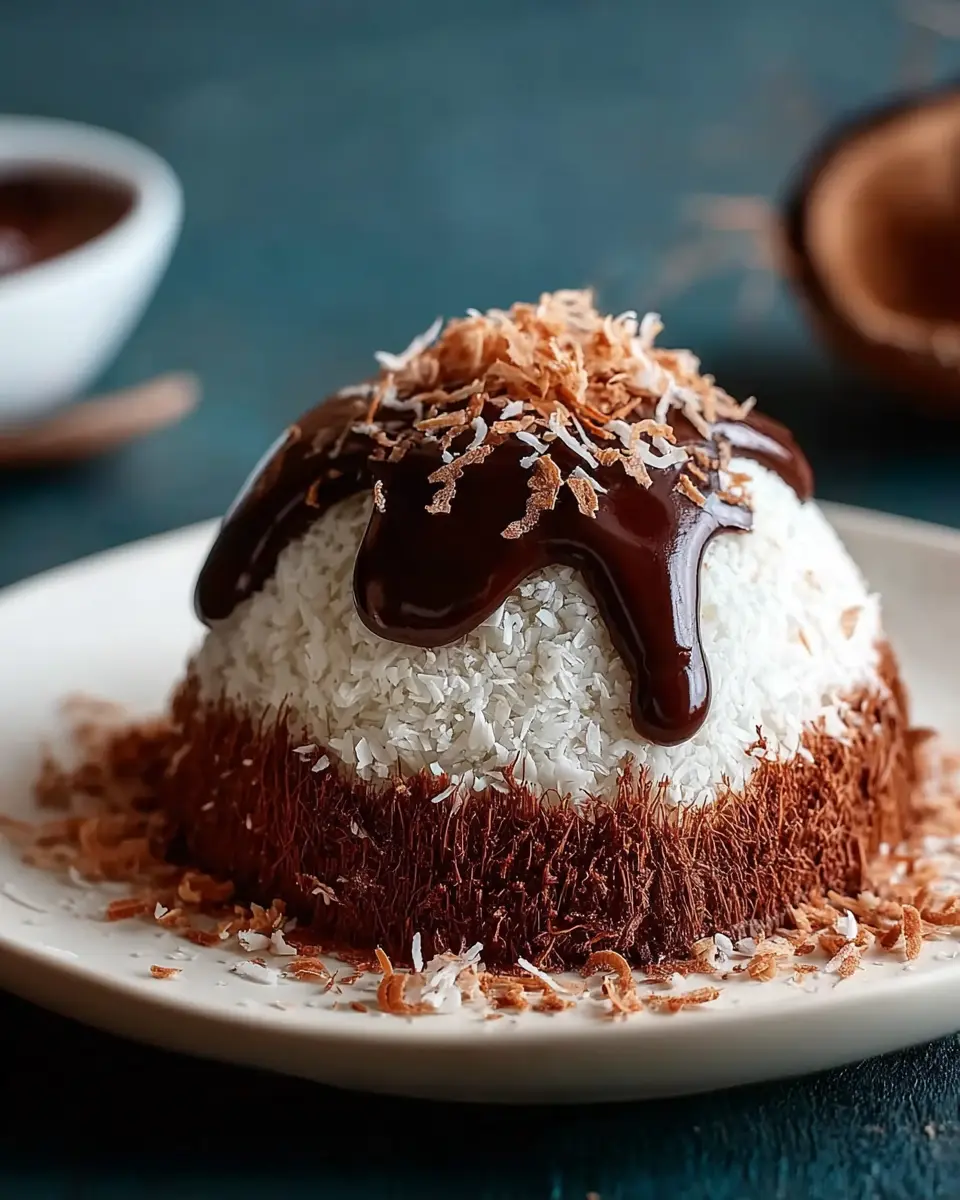
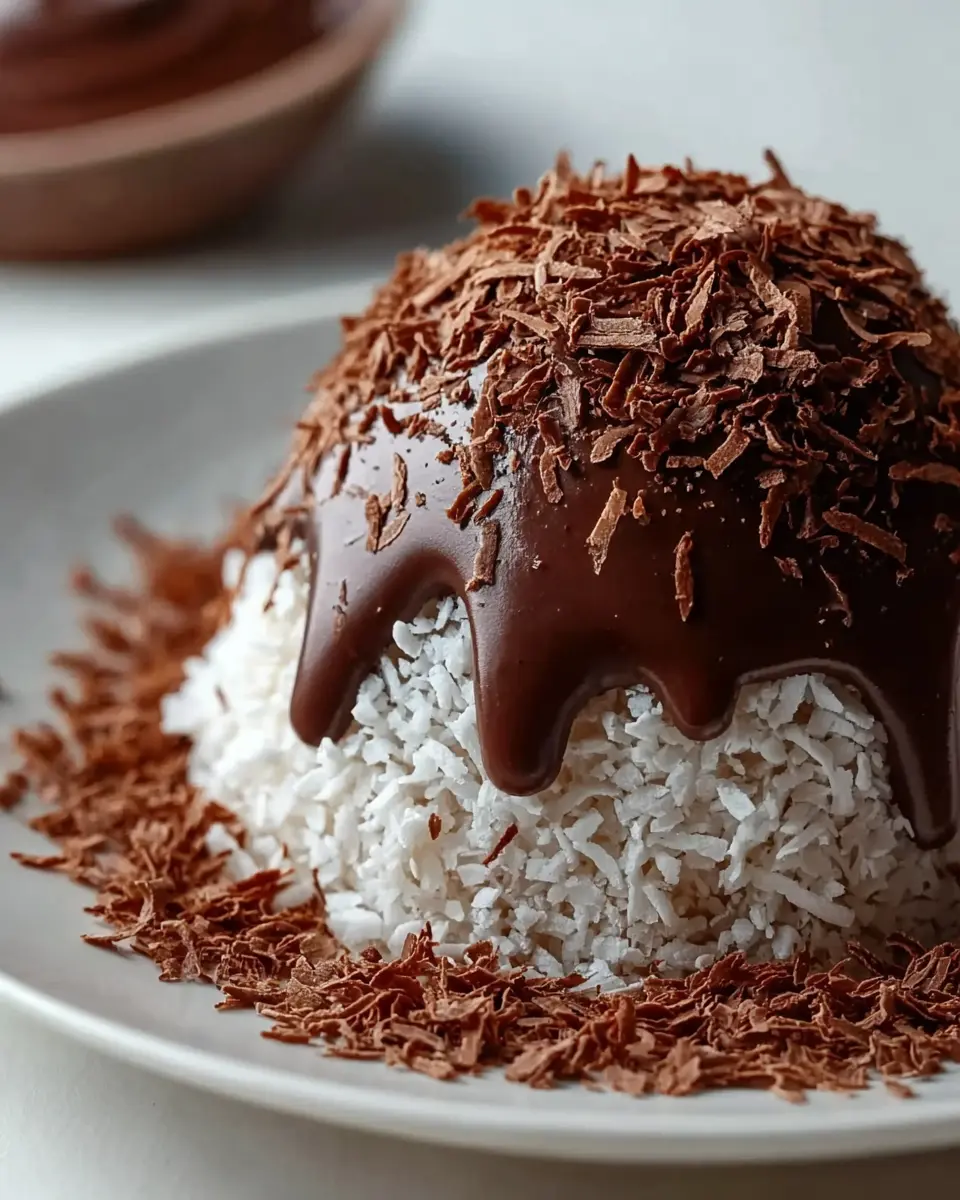
Once chilled, gently lift the dome out of the bowl using the plastic wrap for support. Invert it onto a serving platter and carefully remove the wrap. Now, sprinkle generously with extra desiccated coconut—it adds a lovely texture and visual appeal!
By following these steps, your Coconut Dome with Chocolate Spread will not only impress your guests but also bring a bit of nostalgic joy to your gatherings. Ready to slice and serve? Everyone will be eager for that decadent chocolate center—enjoy!
Variations on Coconut Dome with Chocolate Spread
Tropical Fruit Variation
For a refreshing twist, why not incorporate tropical fruits? Consider adding layers of diced mango, pineapple, or even banana between the chocolate spread and the coconut mixture. The natural sweetness will complement the richness of the Coconut Dome with Chocolate Spread, providing a delightful burst of flavor with each bite. Plus, a pop of color makes the dessert even more appealing!
Nutty Coconut Dome
If you're a fan of crunchy textures, try adding some chopped nuts to the coconut base. Almonds, cashews, or walnuts can bring an exciting crunch to the dish. Simply mix in ½ cup of your favorite nuts with the coconut mixture for an extra layer of flavor. Not only does this variation elevate the dessert, but it also packs a protein punch, making it a bit more wholesome.
Feel free to play with these ideas and create your signature Coconut Dome with Chocolate Spread!
Cooking Tips and Notes for Coconut Dome with Chocolate Spread
Creating a stunning Coconut Dome with Chocolate Spread doesn't have to be daunting. Here are some tips to ensure your dessert looks and tastes fantastic:
-
Temperature Matters: Make sure your butter is softened, but not melted; this will make it easier to blend with the dry ingredients, ensuring a cohesive mixture.
-
Packing the Dome: When pressing the coconut mixture into your bowl, take your time to pack it down firmly. This helps the dome hold its shape and makes for a beautiful presentation when unmolded.
-
Choosing Chocolate Spread: Opt for a high-quality chocolate spread—dark chocolate adds a rich flavor, while hazelnut gives it a nutty twist. For inspiration, check out reviews on chocolate spreads.
-
Chill Time: If you can, refrigerate overnight. This not only improves the texture but enhances the flavor as the ingredients meld together.
By keeping these notes in mind, you're bound to create a delightful showstopper that will impress family and friends. Happy cooking!
Serving Suggestions for Coconut Dome with Chocolate Spread
When presenting your Coconut Dome with Chocolate Spread, consider pairing it with a refreshing beverage like coconut water or a deliciously brewed herbal tea. This combination enhances the dessert's tropical flavor, creating a delightful experience for your guests.
You can also complement the dome with fresh fruits, such as sliced strawberries or a medley of tropical fruits like mango and kiwi. This not only adds a pop of color to your plate but also brings a refreshing contrast to the rich chocolate and coconut.
For an elegant touch, serve individual slices on small dessert plates, garnished with a sprig of mint or a dusting of additional desiccated coconut. This presentation makes the dessert feel extra special and elevates even casual gatherings into memorable moments.
Time Breakdown for Coconut Dome with Chocolate Spread
Preparation Time
Getting your Coconut Dome with Chocolate Spread ready is a breeze! You’ll want to set aside about 20 minutes for all the prep work—from mixing the ingredients to shaping the dome.
Chilling Time
After assembling your lovely dome, it needs to chill and firm up for at least 4 hours. For the best results, consider leaving it overnight relish in suspense as it sets.
Total Time
In total, plan for around 4 hours and 20 minutes to fully enjoy this delightful dessert, featuring a lush chocolate center encased in a coconut blanket. It’s worth every minute!
For further inspiration on coconut-based desserts, check out this guide on tropical desserts for more delicious ideas!
Nutritional Facts for Coconut Dome with Chocolate Spread
Calories
A serving of this delightful Coconut Dome with Chocolate Spread contains approximately 250 calories. It's a treat that can be enjoyed without too much guilt, especially on special occasions!
Sugar Content
With around 16 grams of sugar per serving, much of this sweetness comes from the chocolate spread and powdered sugar. Opting for a reduced-sugar chocolate spread can help you enjoy this dessert with a little less sweetness.
Fat Content
Each serving of the Coconut Dome with Chocolate Spread has about 15 grams of fat, largely thanks to the butter and coconut. The use of healthy fats from coconut can be beneficial in moderation, contributing to energy and satiety.
For more detailed nutritional breakdowns, sites like NutritionData can be extremely helpful. Enjoy your delicious creation while being mindful of your health!
FAQs about Coconut Dome with Chocolate Spread
Can I use fresh coconut instead of desiccated?
Absolutely! While desiccated coconut gives the dome a delightful texture and helps it hold together, you can use fresh coconut if it's conveniently available for you. Just keep in mind that fresh coconut has a higher moisture content, which means you might need to adjust the other liquid ingredients slightly to maintain the right consistency.
How long will the dome last in the fridge?
Your Coconut Dome with Chocolate Spread can last up to a week in the fridge when properly covered. Be sure to keep it wrapped in plastic to prevent it from absorbing any odors while it’s chilling. However, it’s simply too delicious to last that long, so enjoy it as soon as you can!
Is there a vegan alternative for the ingredients?
Definitely! For a vegan version of this treat, substitute the butter with a plant-based alternative (like coconut oil or vegan butter) and opt for a non-dairy milk such as almond or oat milk. Make sure your chocolate spread is dairy-free as well, and you’ll have a delightful vegan dessert that everyone can enjoy! For more tips on vegan baking, check out this resource from the Vegan Society.
Conclusion on Coconut Dome with Chocolate Spread
Creating this Coconut Dome with Chocolate Spread is not just about following a recipe; it's about reviving memories and sharing joy with loved ones. The harmonious blend of coconut and rich chocolate creates a delightful treat that's sure to impress. So, gather your ingredients, and make some sweet moments today!

Coconut Dome with Chocolate Spread
Equipment
- medium-sized round bowl
- mixing bowl
- wooden spoon
Ingredients
- 3 cups desiccated coconut Extra for dusting
- 1 cup powdered sugar
- ½ cup butter softened
- 3 tablespoons milk
- 1 teaspoon vanilla extract
- 1 pinch salt
- 1 cup chocolate spread hazelnut or dark chocolate
- Plastic wrap for lining the bowl
Instructions
- Line a medium-sized round bowl (around 1.5 liters) with plastic wrap. Let the edges hang over so you can lift the dome out easily later.
- In a large mixing bowl, combine desiccated coconut, powdered sugar, and a pinch of salt. Add the softened butter, milk, and vanilla extract. Use a wooden spoon or your hands to mix until the texture becomes a soft, moldable dough.
- Press about two-thirds of the coconut mixture firmly into the bowl, creating a thick layer that lines the entire inside.
- Spoon the chocolate spread into the cavity, smoothing it out evenly. Leave about an inch from the top.
- Use the remaining coconut mixture to cover the chocolate layer. Press gently but firmly to form a complete dome.
- Cover the top with the excess plastic wrap and refrigerate for at least 4 hours—or overnight—until completely firm.
- Gently lift the dome out using the plastic wrap and invert it onto a serving plate. Remove the wrap and sprinkle generously with desiccated coconut.
- Slice into wedges and serve.


Leave a Reply