
Introduction to Artisan No-Knead Pizza Crust
Making pizza at home is a culinary joy, and opting for an artisan no-knead pizza crust can elevate that experience even further. But why go no-knead? The answer lies in simplicity and flavor. By allowing the dough to rise slowly over time, you can create a crust that’s not just easy to work with but also develops a richer, more complex flavor profile. The long fermentation breaks down the gluten, resulting in an airy texture that rivals your favorite pizzeria.
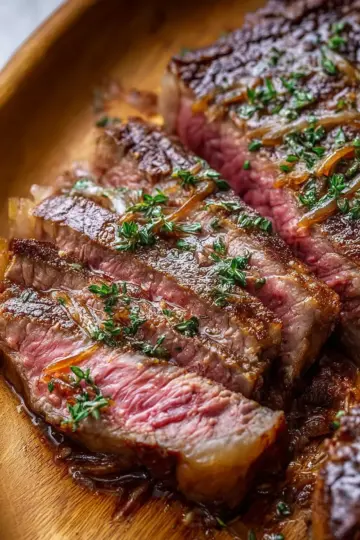
Imagine pulling a hot pizza from your oven, its crust golden and perfectly puffed with a delightful chew. This method suits busy lifestyles; you can prepare your dough in just 15 minutes and let it rest in your fridge for up to six days! This flexibility transforms any night into Pizza Night, regardless of your schedule. Just stretch, top, and bake!
For the ultimate crust, we recommend using a high-protein bread flour, which lends that wonderful chewiness while still being easy to handle. You don’t need to be a professional chef to make this happen. Embrace the beauty of no-knead pizza crust, and soon you'll be crafting delectable pies that impress family and friends alike!
Why Go No-Knead for Pizza Crust?
By choosing a no-knead method, you save time and effort without compromising quality. Traditional kneading can be strenuous, especially after a long day. No-knead pizza dough offers a relaxed approach, allowing you to enjoy the process and the final product. This means more joy and less stress in the kitchen! Plus, it opens up pathways for creativity—try exciting toppings like roasted butternut squash, Turkey bacon, or fresh veggies. Explore more pizza variations with confidence!
Ingredients for Artisan No-Knead Pizza Crust
Essential ingredients for the dough
To create your Artisan No-Knead Pizza Crust with that irresistible chewy texture and lightness, you'll need just a handful of essential ingredients:
- 2 cups plus 1 tablespoon (247g) King Arthur Unbleached Bread Flour: This is key for the perfect crust. You can swap it for an equal amount of all-purpose flour if you prefer a less chewy texture.
- ⅛ teaspoon active dry yeast or instant yeast: This helps the dough rise beautifully, creating those delightful air pockets.
- ½ teaspoon granulated sugar: A touch of sweetness balances the flavors and supports fermentation.
- 1 ¼ teaspoons (8g) table salt: This enhances the overall flavor and controls yeast activity.
- ¾ cup plus 1 tablespoon (185g) lukewarm water: Ideal for activating the yeast, giving the dough the right consistency.
Topping options to enhance your pizza
The fun of pizza-making comes alive when it’s time to get creative with toppings! Here are some ideas to elevate your Artisan No-Knead Pizza Crust:
- Veggie Vinaigrette Pizza: Spread a light layer of red sauce and sprinkle with grated mozzarella. Top with roasted butternut squash, quick-pickled onions, and a drizzle of your favorite vinaigrette for a tangy finish.
- Smoky-Sweet Pizza: Start with a layer of BBQ sauce, add grated mozzarella, and top with sliced pears, turkey bacon, and scallions that have been lightly fried. Finish with a squirt of BBQ sauce for extra flavor.
Feel free to mix and match your favorite ingredients – after all, every pizza is a personal masterpiece!
Step-by-Step Preparation of Artisan No-Knead Pizza Crust
Making an Artisan No-Knead Pizza Crust is simpler than it sounds! Follow these steps, and you’ll be amazed at how easy it is to create a delicious, puffy crust at home.
Gather and Measure Your Ingredients
Before diving into the dough-making process, it’s crucial to get organized. Start by gathering the following ingredients:
- 2 cups plus 1 tablespoon (247g) King Arthur Unbleached Bread Flour
- ⅛ teaspoon active dry yeast or instant yeast
- ½ teaspoon granulated sugar
- 1 ¼ teaspoons (8g) table salt
- ¾ cup plus 1 tablespoon (185g) lukewarm water
Weighing your flour is ideal for accuracy, but if you prefer measuring, gently spoon it into your cup and sweep off any excess. Once you have everything at hand, we can move on!
Mix the Dough and Let It Rise
In a large bowl, combine all the ingredients until they form a rough, sticky dough. No need to knead! Cover the bowl with plastic wrap or a clean kitchen towel and let it rise at room temperature for about 24 hours. This lengthy first rise is what develops that amazing flavor in your Artisan No-Knead Pizza Crust. If you're feeling patient, refrigerate the dough for up to six days for even deeper flavors!
Prepare Your Oven and Baking Tools
While your dough is rising, it's time to get your oven ready. Position a rack in the center and preheat your oven to 500°F to 550°F. If you have a baking steel or pizza stone, place it in there as well. Let the oven preheat for at least 30 minutes—this ensures your crust bakes evenly and achieves that delightful char.
Shape the Dough for Your Pizza
Once the dough has risen, it’s time to bring it to life! Start by dividing the dough in half. Transfer one piece to a well-floured surface and stretch it gently, folding the dough over itself to create a ball. Repeat for the other piece. Place them seam-side down in floured bowls and let them proof for about 45 minutes while your oven is heating up.
Pre-Bake Your Crust and Add Toppings
After proofing, carefully move one dough ball to a floured surface for shaping. Dust the top with flour, and use your fingertips to press it down gently, ensuring the edges remain thick. Stretch it into a circle about 10" to 12" in diameter and place it on a floured pizza peel or parchment paper. Add your preferred sauce and toppings—go wild! Whether it’s a classic margherita or something unique, the choices are endless.
Bake to Perfection
Finally, turn on your broiler! Place the pizza on the steel or stone, ensuring there’s about 8 inches of space between the pizza and the heating element. Bake for about 6 minutes until bubbly and slightly charred. As soon as it comes out of the oven, don’t forget to add a sprinkle of freshly grated Parmesan! Enjoy your masterpiece hot out of the oven.
With this simple guide, you’ll be on your way to creating the ultimate Artisan No-Knead Pizza Crust that will impress family and friends alike. Happy baking!
Variations on Artisan No-Knead Pizza Crust
Veg Vinaigrette Pizza Variation
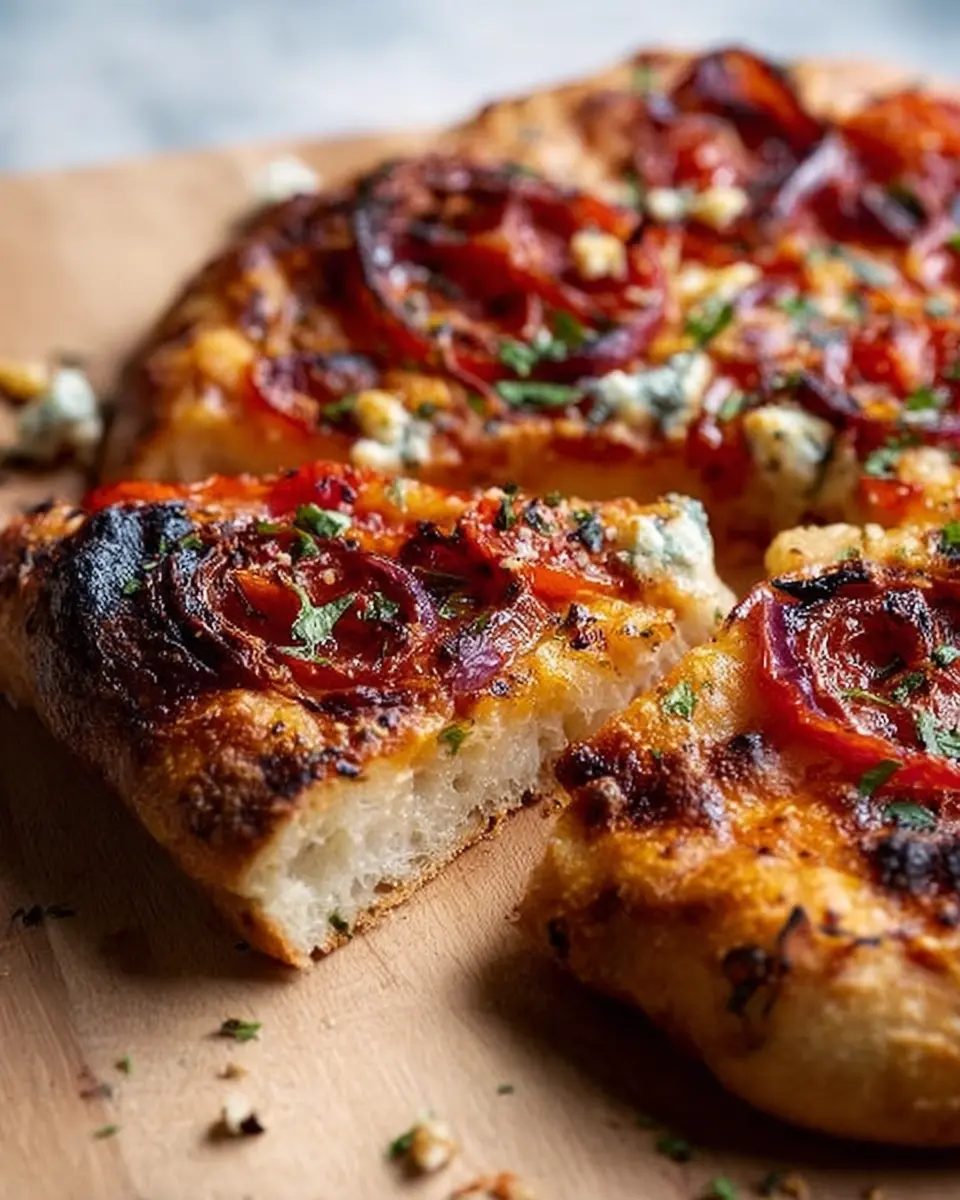
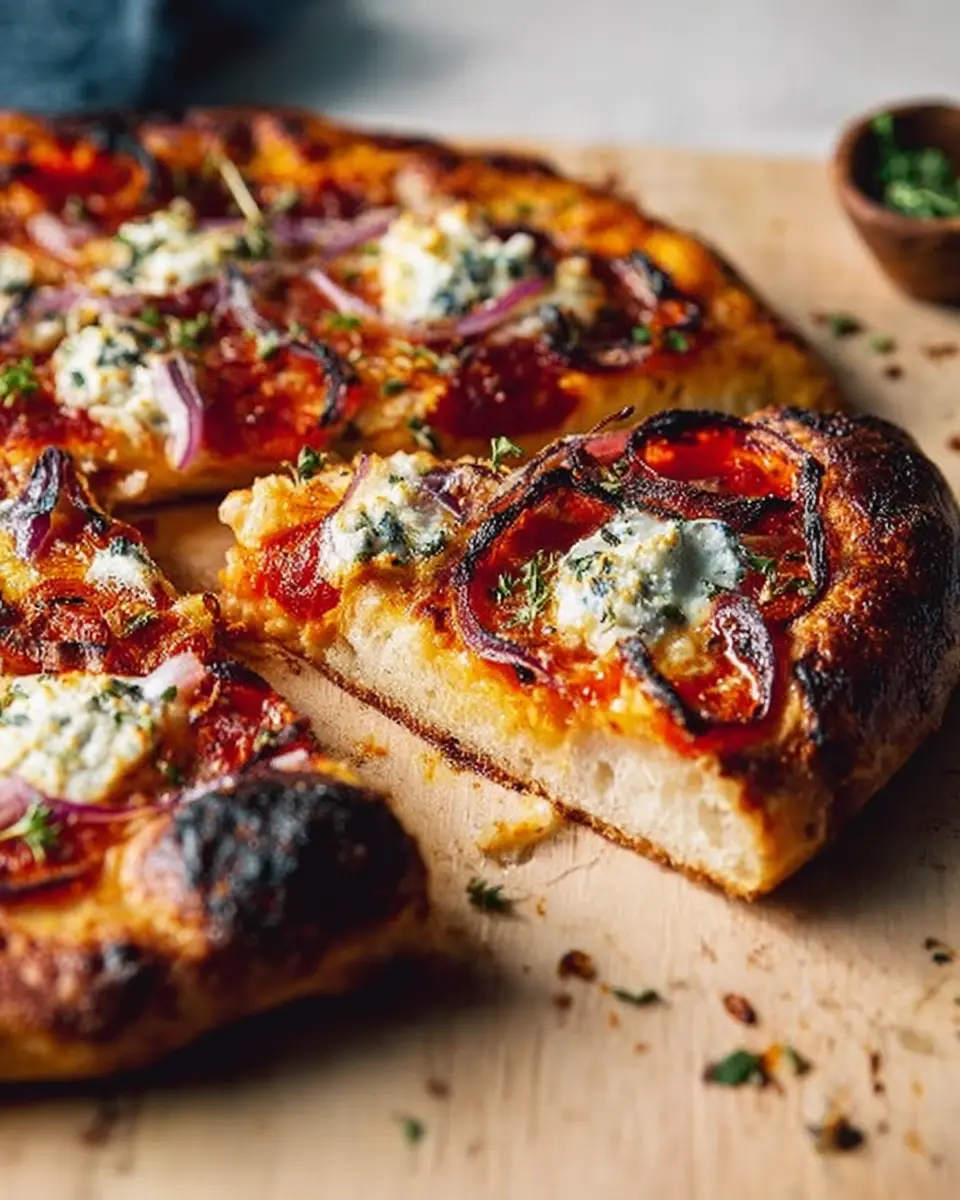
Transform your Artisan No-Knead Pizza Crust into a fresh Veg Vinaigrette delight! Start with a base of tomato sauce, then sprinkle grated mozzarella. Add roasted butternut squash or sweet potato for a hint of sweetness. Once baked to perfection, drizzle your favorite vinaigrette over the top, enhancing the aromatic experience. Don’t forget quick-pickled red onions and a sprinkle of feta or crumbled blue cheese for a lovely burst of flavor.
Smoky-Sweet Pizza Variation
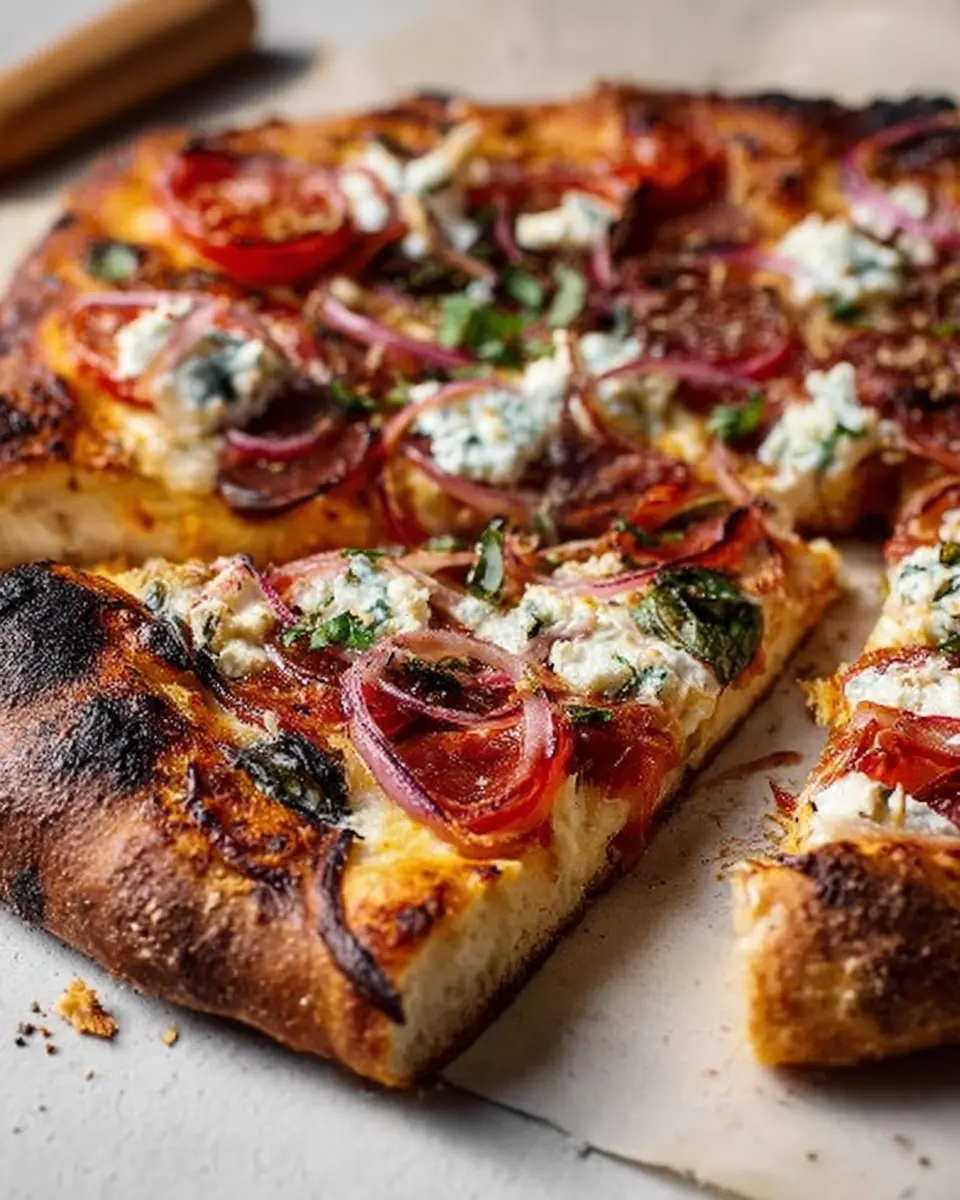
For a pizza with a twist, try the Smoky-Sweet variation! Spread a thin layer of BBQ sauce on your Artisan No-Knead Pizza Crust, followed by mozzarella. Layer with sliced pears and turkey bacon, and some thinly sliced scallions that have been flash-fried in oil for added crunch. After baking, finish it off with a drizzle of BBQ sauce mixed with tomato sauce for that perfect smoky-sweet balance.
Not only will these variations impress your friends at the next Pizza Night, but they also showcase how versatile your Artisan No-Knead Pizza Crust can truly be!
Cooking Tips and Notes for Artisan No-Knead Pizza Crust
Best Practices for Storing Dough
To keep your Artisan No-Knead Pizza Crust dough fresh, store it in an airtight container in the fridge. This method allows the flavors to develop over time. Using the dough within six days guarantees optimal taste and texture. If you plan to use it later, you can even freeze it; just make sure to let it thaw in the refrigerator overnight before use.
Tips for Using Toppings Effectively
When crafting your pizza masterpiece, consider the order and type of toppings you use. Begin with a light layer of sauce to prevent the crust from becoming soggy. Follow up with your favorites like Turkey Bacon or veggies, ensuring even distribution for balanced flavor. For an elevated touch, drizzle with a homemade vinaigrette after baking to add brightness and a pop of freshness. This technique allows the vinaigrette's flavor to shine through beautifully.
For more topping ideas, check out King Arthur Flour's Topping Ideas.
Serving Suggestions for Artisan No-Knead Pizza Crust
Pairing Your Pizza with Sides
To elevate your Artisan No-Knead Pizza Crust, consider serving it with some delicious sides. A refreshing arugula salad drizzled with lemon and olive oil complements the rich flavors of your pizza perfectly. Roasted seasonal vegetables or a vibrant caprese salad with fresh mozzarella and basil also make excellent choices. For something a bit heartier, garlic bread or a platter of antipasto can enhance your meal experience.
Suggestions for Beverages That Complement Your Pizza
When it comes to beverages, think outside the typical soft drinks. A chilled sparkling water with a slice of lemon or lime is incredibly refreshing. You might also enjoy a fruity cider or a rich iced tea infused with herbs like mint. If you’re feeling adventurous, try pairing your pizza with a creative mocktail made from fresh fruit juices and herbs, ensuring your meal is both satisfying and enjoyable.
Time Breakdown for Artisan No-Knead Pizza Crust
Creating the perfect Artisan No-Knead Pizza Crust is not only about the ingredients but also about timing. Let's break down the key phases so you can plan your pizza night!
Preparation time
You’ll need approximately 15 minutes to gather your ingredients, mix the dough, and set it aside for its first rise. Quick and straightforward, right?
Dough rising time
The dough needs about 24 hours to rise at room temperature. You also have the option to refrigerate it for up to six days, allowing the flavors to develop beautifully. Talk about planning ahead!
Baking time
When you’re ready to indulge, preheat your oven for at least 30 minutes at 500°F to 550°F. Once your pizza is in, it takes about 4 to 8 minutes to achieve a bubbly, perfectly charred crust that will leave your taste buds tingling.
With this timeline, you're all set for a delightful pizza-making experience. For more tips on mastering your dough, check out sources like Serious Eats or King Arthur Baking. Happy baking!
Nutritional Facts for Artisan No-Knead Pizza Crust
Calories
One serving of Artisan No-Knead Pizza Crust contains approximately 150 calories. This makes it a satisfying base for your favorite toppings while keeping your overall meal balanced.
Protein
Each slice offers about 6 grams of protein, thanks to the high-protein bread flour used to craft this delicious crust. It's a great way to incorporate essential nutrients into your pizza night!
Sodium
In just one slice, you’ll find around 300 mg of sodium, primarily coming from the added salt. For those watching their sodium intake, consider adjusting the salt or toppings to suit your dietary needs.
For more ideas on making healthier choices while enjoying your favorite foods, check out Healthline's nutrition advice.
FAQs about Artisan No-Knead Pizza Crust
How can I ensure a crispy pizza crust?
To achieve that perfectly crispy crust, there are a few tricks you can employ. First, make sure your oven is preheated to a high temperature, around 500°F to 550°F. By placing a baking steel or stone in the oven, you create an ideal cooking surface that mimics a professional pizza oven. Additionally, keep your toppings minimal; a heavy load can lead to a soggy base. Finally, bake your pizza on the lowest rack if possible, as this helps achieve a crispier bottom.
What toppings should I avoid for no-knead pizza?
When crafting your Artisan No-Knead Pizza Crust, it's best to steer clear of particularly watery toppings like fresh tomatoes or excessive sauces. These can create moisture that prevents a crispy crust from forming. Instead, opt for drier ingredients, pre-cooked vegetables, or lightly sauced options for the best results.
Can I freeze the dough for later use?
Absolutely! The no-knead dough can be frozen for up to three months. Just wrap it tightly in plastic wrap or foil before placing it in an airtight container. When you're ready to use it, thaw the dough in the refrigerator overnight, then let it come to room temperature before stretching it out for your next pizza night. Enjoy the flexibility and convenience!
Conclusion on Artisan No-Knead Pizza Crust
In summary, the Artisan No-Knead Pizza Crust empowers home chefs to create delicious homemade pizzas with minimal effort. With its light, puffy edges and thin center, this crust rivals even the finest pizzerias. Try it out, and soon every night will feel like Pizza Night!
Artisan No-Knead Pizza Crust
Equipment
- Oven
- baking steel
- Pizza Peel
- floured surface
- floured bowls
Ingredients
Dough
- 2 cups King Arthur Unbleached Bread Flour plus 1 tablespoon (247g)
- ⅛ teaspoon active dry yeast or instant yeast
- ½ teaspoon granulated sugar
- 1 ¼ teaspoons table salt (8g)
- ¾ cup water lukewarm plus 1 tablespoon (185g)
Toppings
- Veg Vinaigrette see tips for details
- Smokey-Sweet Pizza see tips for details
Instructions
Dough Preparation
- Weigh your flour; or measure it by gently spooning it into a cup, then sweeping off any excess. Stir all of the ingredients together. Cover the rough, sticky dough and let it rise at room temperature for 24 hours. After this first rise, you may choose to refrigerate the dough for up to six days, which will help develop its flavor.
- With a rack in the center, preheat the oven to 500°F to 550°F with a baking steel or stone inside. Make sure the oven is at least 500°F for a full 30 minutes before baking your pizza, in order for the steel or stone to preheat thoroughly.
- Divide the dough in half. Working with one piece at a time, transfer the dough to a well-floured surface.
- Stretch and fold it, as follows: Holding onto the dough at both ends, pull one end away from the other, then fold it back onto itself. Repeat on the other side so that all four corners of the dough have been stretched and folded.
- Next, pull the ends of the dough toward the middle, then turn it over. Using your fingers, pull the dough under itself to make a smooth, round ball with the seams tucked into the bottom. Repeat with the other piece of dough. Place each ball seam-side down into a floured bowl.
- Cover the bowls and allow the dough to proof (rise) for 45 minutes to an hour, while your oven preheats.
- Working with one piece at a time, transfer the dough to a well-floured work surface and dust the top with flour. Use your fingertips to gently depress the surface, being careful not to touch the outer edge of the crust; you want it to remain thick.
- Lift up the crust and use your knuckles to gently stretch it into a circle about 10" to 12" in diameter. Move it to a well-floured pizza peel or floured sheet of parchment. If you're using parchment, trim the excess around the dough to prevent it from burning.
- Lightly sauce the dough, then add your toppings of choice. For special toppings easy to prepare in advance see tips.
- Turn on the top broiler in your preheated oven and transfer the pie to the steel or stone. Be sure there's at least 8" of space between the surface of the pizza and the broiler. If you have an oven with the broiler on the bottom, make sure there's at least 8" between the broiler and the cooking surface. If there isn't, don't use the broiler.
- Gently slide the pizza onto the steel or stone. Bake the pizza for approximately 6 minutes on the steel (or 7 minutes on the stone), until bubbly and charred on the edges. Remove the pizza from the oven and top it with freshly grated Parmesan, if desired. Slice and serve the pizza immediately.
- Repeat with the remaining dough and toppings.


Leave a Reply