
Introduction to Homemade Nutter Butters
If you're a young professional juggling the demands of work and life, creating tasty snacks at home can feel like a luxury. Enter homemade Nutter Butters—the ultimate treat you can whip up during a weekend baking session. With a few simple ingredients, these cookies let you indulge in a nostalgic favorite, while also providing a boost of energy from protein-packed peanut butter.
Why make your own? Store-bought versions often come with preservatives and artificial flavors. But when you bake at home, you're not only making healthier choices but also customizing your snack to suit your taste preferences. Plus, sharing homemade Nutter Butters with friends or coworkers can turn a simple gathering into a delightful experience.
Here’s a little secret: baking can be a stress reliever. The rhythmic mixing of ingredients and the inviting aroma wafting through your kitchen can help melt away the day's worries. And for those busy weekdays, these cookies are perfect for pre-portioning into snack bags, ensuring you always have a delicious pick-me-up waiting for you. Ready to get baking? Let’s dive into the recipe!
Ingredients for Homemade Nutter Butters
Essential ingredients for delicious cookies
Creating your own Homemade Nutter Butters starts with a few essential ingredients that come together to form the perfect cookie base. Here’s what you’ll need:
- Creamy peanut butter: Use your favorite brand, like Jiff or Skippy, for that rich flavor.
- Unsalted butter: Keeping it unsalted allows you to control the sweetness.
- Light brown sugar: This adds that lovely caramel note and a hint of moisture.
- Eggs and vanilla extract: These two simple ingredients are key to binding the mixture and enhancing flavor.
- All-purpose flour and cornstarch: These provide the perfect structure, creating a chewy yet soft cookie.
Key ingredients for the peanut butter filling
Now, let’s talk about the star of the show—the decadent peanut butter filling! Here’s what you’ll need:
- Creamy peanut butter: Stick to the good stuff for a truly rich taste.
- Powdered sugar: This sweetens the filling and gives it a delightful creaminess.
- Heavy cream: Just a touch helps achieve that perfectly spreadable consistency.
- Vanilla extract: A splash of vanilla brings warmth and complexity to the filling.
With these ingredients, you're just a few steps away from indulging in homemade delights that can rival any store-bought cookie. Have fun baking!
Step-by-step preparation for Homemade Nutter Butters
Creating your own Homemade Nutter Butters is not just about satisfying a sweet tooth; it's about enjoying the process of baking. Let’s guide you through each step to ensure your homemade cookies turn out perfectly delightful. Ready? Let’s dive in!
Prepping your kitchen for success
Before you start mixing, set yourself up for victory.
-
Gather your ingredients: Make sure you have everything on hand—from creamy peanut butter to powdered sugar. Having everything ready means fewer interruptions while you bake.
-
Organize your workspace: Clear your counter and set out all necessary tools like mixing bowls, measuring cups, and a stand mixer (or a good old fashioned whisk if you prefer).
-
Preheat your oven: Set it to 350°F. Preheating the oven ensures even baking from the get-go.
Did you know that a clean and organized kitchen can reduce your chances of mistakes? It really does help to have everything tidy!
Mixing the cookie dough
Now, let’s make some cookie magic!
-
In your stand mixer (or large bowl), beat together ¾ cup of creamy peanut butter, ¼ cup unsalted butter, and 1 cup packed light brown sugar. Start on low speed, then gradually increase to medium-high. For the fluffiest results, aim to beat until it’s light and fluffy—about a minute.
-
Scrape down the sides and add in 1 large egg and 1 teaspoon of pure vanilla extract. Beat just until combined.
-
Lastly, blend in your dry ingredients: 1 cup all-purpose flour, 2 tablespoons cornstarch, ¼ teaspoon baking soda, and ½ teaspoon salt. Mix until there are no streaks of flour left.
Shaping and baking the cookies
Time to shape those beauties!
-
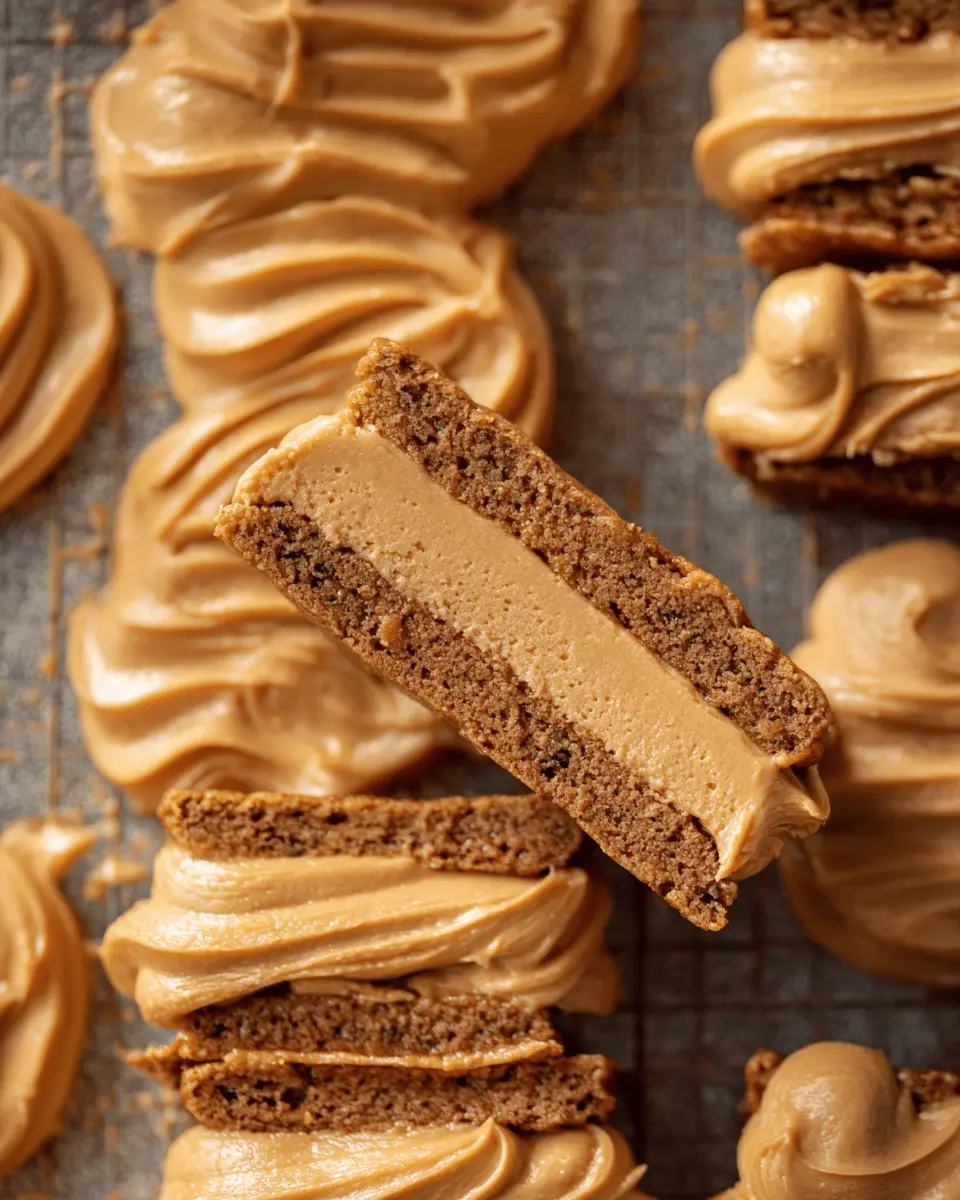
Use a standard 1-ounce cookie scoop to portion out the dough. Flatten each portion into an oval that resembles a peanut; this gives your Nutter Butters their iconic shape.
-
Place them on lined baking sheets and create crosshatches with a fork at both ends. This not only looks great but also helps with that iconic texture.
-
Bake for about 9 to 10 minutes until they’re set but still soft in the middle. You want that perfect blend of chewy and crisp.
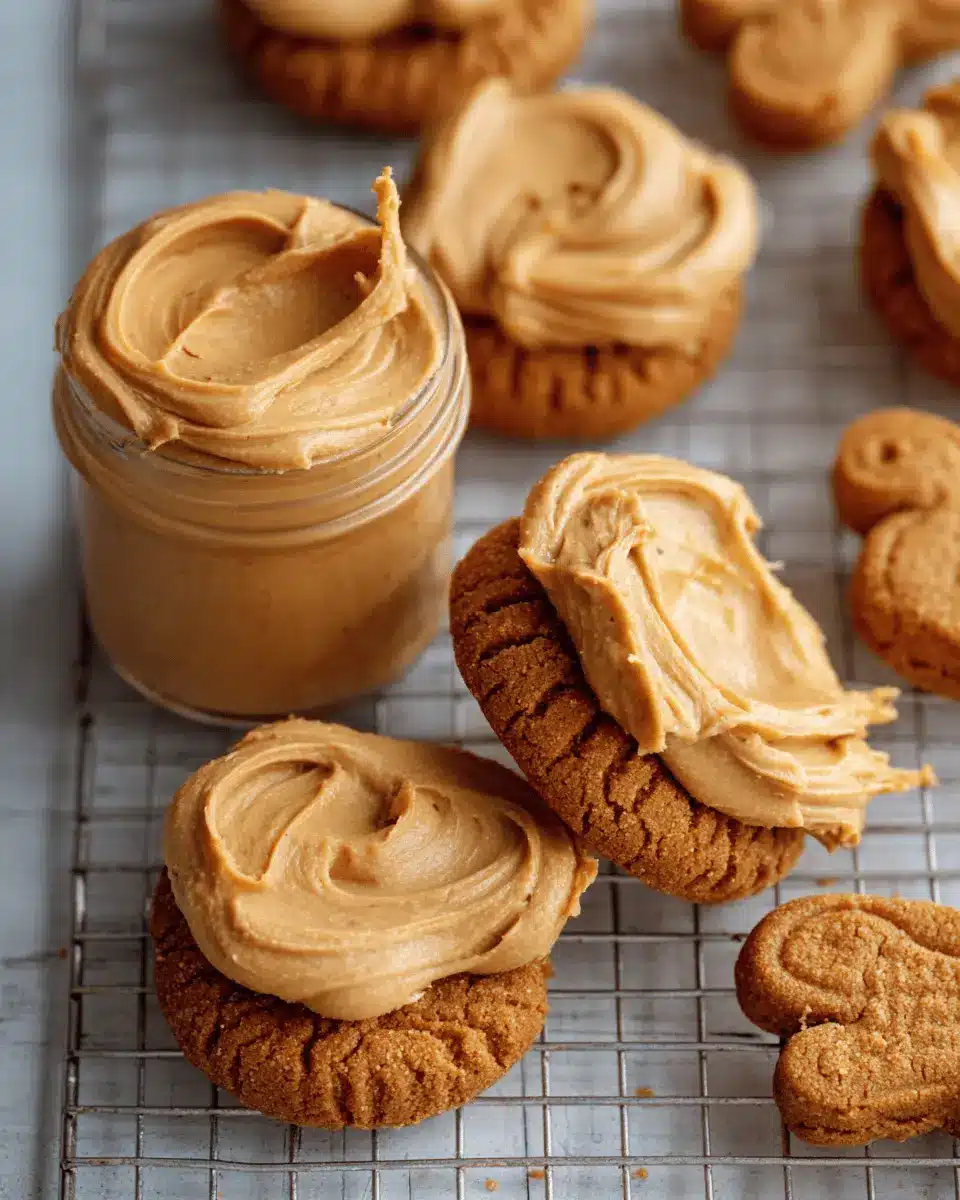
Making the creamy peanut butter filling
While your cookies cool, it’s time to whip up that delicious filling!
-
In your stand mixer, combine ½ cup creamy peanut butter, ⅔ cup powdered sugar, 3 to 4 tablespoons of heavy cream, and ½ teaspoon vanilla extract. Mix on low speed; you don’t want to overwork it and risk splitting the cream.
-
If your filling is too thick, add a little more cream until you reach that perfect creamy consistency.
Assembling your homemade Nutter Butters
Finally, the moment you've been waiting for!
-
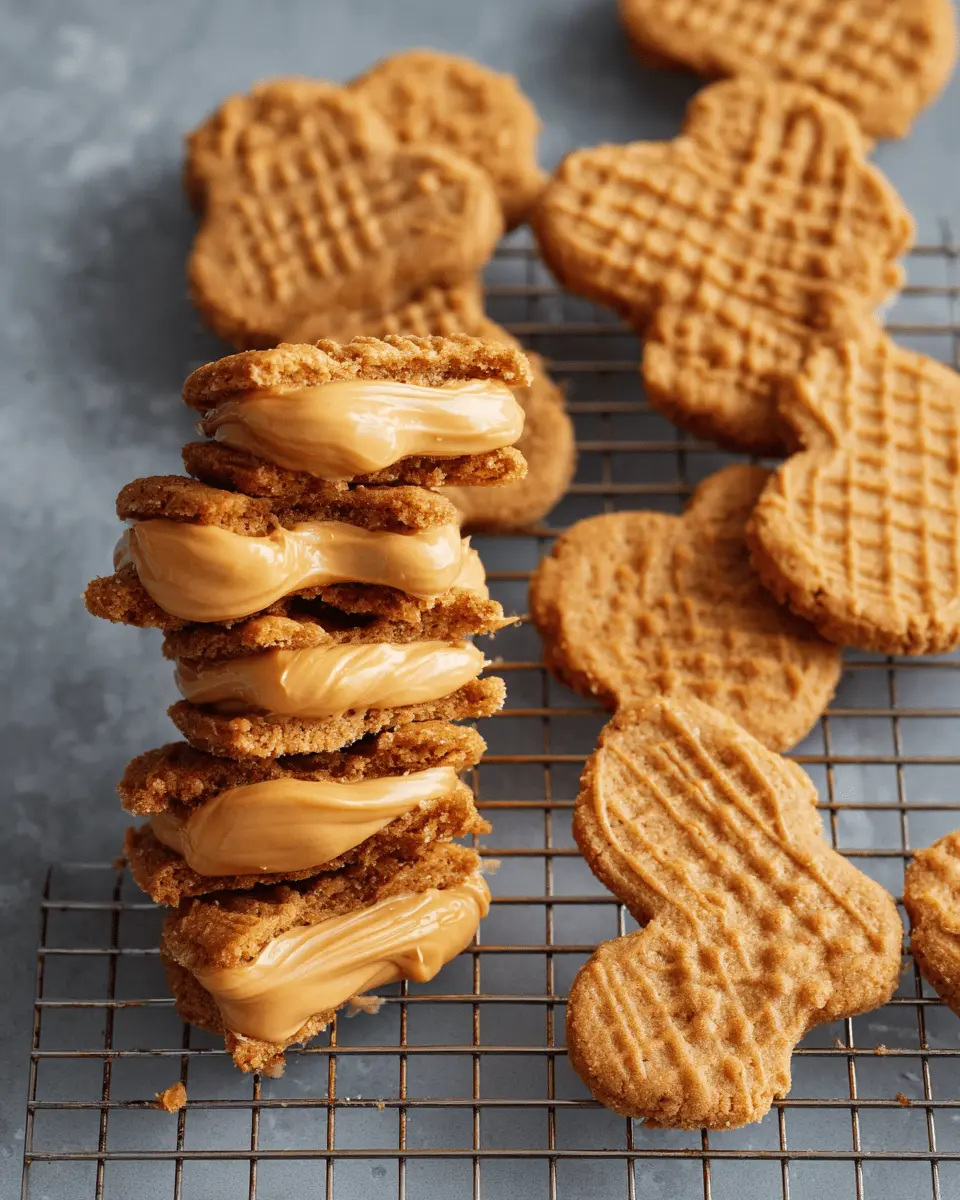
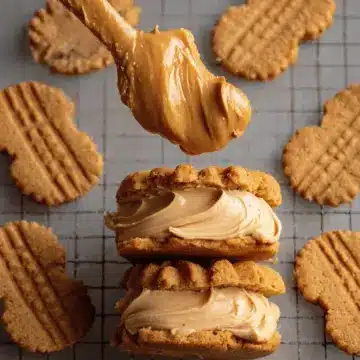
Pair your cooled cookies and pipe about two teaspoons of filling onto the bottom of one half. Sandwich it with the other half.
-
Repeat until you’ve assembled all your Homemade Nutter Butters.
Enjoy them fresh, or store them in an airtight container for snack time later! Trust me, you’ll want to savor every bite of your homemade creations.
So, what do you think? Are you ready to get those Nutter Butters baking? Let’s make your kitchen smell absolutely amazing!
Variations on Homemade Nutter Butters
When it comes to these delightful Homemade Nutter Butters, the fun doesn't have to end with the classic peanut butter cookie. Here are some creative variations to elevate your treat game:
Chocolate-dipped Nutter Butters
Why not take your Nutter Butters to the next level by dipping them in rich, melted chocolate? Simply melt your favorite semi-sweet or dark chocolate, then dip half of each cookie into the chocolate. Allow them to set on parchment paper for a delicious twist—and who can resist that chocolatey goodness?
Nutter Butters with a Twist: Adding Crushed Nuts
Adding texture can make a world of difference. Consider sprinkling crushed peanuts or even walnuts on the filling before sandwiching the cookies. This adds a delightful crunch while enhancing that classic peanut butter flavor. Plus, it’s a great way to impress your friends! For more inspiration on nut varieties, check out this guide on nut-based snacks.
Feel free to experiment and make these Homemade Nutter Butters your own!
Cooking Tips and Notes for Homemade Nutter Butters
Tips for Achieving the Perfect Cookie Texture
To get those irresistibly chewy and tender Homemade Nutter Butters, make sure to not overbake your cookies; a minute can make all the difference! Pull them out when they are set and slightly soft in the middle. Let them cool fully on the baking sheet before transferring to a wire rack. This allows the cookies to firm up without becoming dry.
Storing Your Nutter Butters for Freshness
For peak freshness, store your Homemade Nutter Butters in an airtight container at room temperature. They’ll stay delicious for about a week. If you want them to last longer, consider freezing them. Just layer them between parchment paper in a freezer-safe container, and they can last for up to three months! Enjoy each cookie straight from the freezer, or allow them to thaw at room temperature.
With these tips, you’ll bring out the best in your Homemade Nutter Butters!
Serving suggestions for Homemade Nutter Butters
Pairing with milk or coffee for the ultimate treat
There's nothing quite like enjoying your Homemade Nutter Butters with a cold glass of milk or a steaming cup of coffee. The creamy peanut butter filling pairs beautifully with the rich flavors of your favorite brew. For a cozy afternoon snack, try dunking your cookie into that warm beverage; you'll be amazed at how the textures complement each other!
Creative ways to serve at gatherings
Planning a get-together? Impress your guests by serving your Homemade Nutter Butters on a stylish platter. Consider drizzling them with melted chocolate or garnishing with crushed nuts. You could also create a fun dessert bar with toppings like sprinkles, whipped cream, or even a selection of flavored syrups. Guests can customize their own cookies, making the experience interactive and delightful! Whether it’s a birthday party or just a casual coffee catch-up, these cookies are sure to be a hit. Looking for more ideas? Check out Food Network's entertaining tips.
Time breakdown for Homemade Nutter Butters
Preparation time
To get started on your Homemade Nutter Butters, set aside about 45 minutes for preparation. This includes mixing the dough and preparing the filling.
Cooking time
The baking process only takes 10 minutes, creating that perfect golden-brown exterior for your cookies.
Total time
All in all, you’ll need 1 hour to whip up these delicious treats from scratch, making it a rewarding endeavor that’s well worth your time!
When you're ready, check out your kitchen tools like a cookie scoop and mixing bowls to ensure a smooth process. Enjoy every bite of these homemade delights!
Nutritional Facts for Homemade Nutter Butters
Calories per Serving
Each delicious serving of these Homemade Nutter Butters contains approximately 120 calories. This makes them a satisfying treat without derailing your healthy eating goals.
Protein Content
Packed with peanut butter goodness, these cookies deliver about 3 grams of protein per serving. Perfect for a quick energy boost during your busy day!
Sugar Levels
With roughly 8 grams of sugar per cookie, these treats balance sweetness with satisfying peanut flavor, making them a delightful pick-me-up without overwhelming your diet. For more tips on managing sugar intake, feel free to check out resources from the American Heart Association.
Enjoy your homemade delights mindfully!
FAQ about Homemade Nutter Butters
Can I modify the recipe for allergies?
Absolutely! If you're dealing with allergies, you can easily swap in alternatives. For instance, use sunflower seed butter instead of peanut butter for nut allergies, and select gluten-free flour for a gluten-friendly version. Always check labels to be sure everything is safe for your dietary needs. There are plenty of allergy-friendly ingredients available today!
How long do homemade Nutter Butters last?
Your delicious homemade Nutter Butters can last up to a week at room temperature if stored in an airtight container. If you want to keep them fresh even longer, consider refrigerating them, which can extend their shelf life up to two weeks. You can also freeze them for up to three months—just separate layers with parchment paper to avoid sticking.
What should I do if my filling is too thick?
If the filling feels too thick, fear not! Simply add an extra tablespoon of heavy cream to reach that dreamy, spreadable consistency. Beat it on low until smooth, making sure not to overmix. This is an easy fix that ensures your Nutter Butters are perfectly creamy!
Conclusion on Homemade Nutter Butters
The joy of making homemade treats and sharing them with loved ones
Creating homemade Nutter Butters is more than just baking; it's about sharing joy and deliciousness. Each cookie embodies warmth and care, perfect for family gatherings or cozy chats with friends. With your personal touch, these treats will surely bring smiles to everyone who tastes them!
Homemade Nutter Butters
Equipment
- Stand Mixer
- cookie scoop
- baking sheet
- piping bag
Ingredients
for the cookies
- ¾ cup creamy peanut butter we recommend Jiff or Skippy!
- ¼ cup unsalted butter at room temperature
- 1 cup packed light brown sugar
- 1 large egg at room temperature
- 1 teaspoon pure vanilla extract
- 1 cup all-purpose flour
- 2 tablespoons cornstarch
- ¼ teaspoon baking soda
- ½ teaspoon salt
for the peanut butter filling
- ½ cup creamy peanut butter
- ⅔ cup powdered sugar
- 3 - 4 tablespoons heavy cream
- ½ teaspoon vanilla extract
Instructions
Making the Cookies
- Preheat the oven to 350°F. Line a baking sheet with parchment paper. Set aside.
- In a stand mixer fitted with the paddle attachment, beat together the peanut butter, butter, and brown sugar on low speed until combined. Gradually increase to medium-high and beat until light and fluffy, about 1 minute.
- Scrape down the sides and bottom of the bowl, then add in the egg and vanilla. Beat to combine.
- Add the flour, cornstarch, baking soda, and salt and beat on low speed until just combined and no streaks of flour remain.
- Use a 1 ounce cookie scoop to portion out equal amounts of dough. Shape into flat oval discs and place on the prepared baking sheets, spacing 2 inches apart. Use a fork to make crosshatches on each cookie.
- Bake for 9 to 10 minutes or until the cookies are puffed up and firm around the edges but still soft in the middle. Allow to cool completely.
Making the Filling
- In a stand mixer fitted with the paddle attachment, combine the peanut butter, powdered sugar, 3 tablespoons of the heavy cream, and vanilla extract. Beat on low speed until smooth, without overmixing.
- If the filling is too thick, add the last tablespoon of cream. Transfer to a piping bag.
- Match up cooled cookies into pairs, pipe about two teaspoons of filling onto the bottom of one half, and sandwich with the other half. Repeat until finished.
Leave a Reply