
Introduction to Butterfinger Balls
Are you in search of a quick and delightful dessert that will impress your friends and satisfy your sweet tooth? Look no further than Butterfinger Balls! These little gems combine creamy peanut butter, rich chocolate, and crunchy Butterfinger Bits, making them a deliciously addictive treat. With only five ingredients and a prep time of just 30 minutes, they are perfect for any occasion—whether it’s a casual get-together or a cozy night in.
Why are Butterfinger Balls the perfect homemade treat?
One of the best things about Butterfinger Balls is their simplicity. You don’t need to be a skilled baker to whip these up! Plus, they allow for creativity; you can customize the toppings or even experiment with different types of chocolate. Did you know that homemade treats not only taste better but also bring a personal touch that store-bought versions often lack? When you make these at home, you can guarantee the freshness of ingredients and the absence of artificial additives.
These balls can easily be tailored to fit dietary preferences, too. For example, if you're looking for vegan options, substitute the peanut butter and chocolate with plant-based alternatives. So, gather your ingredients and get ready to enjoy some Butterfinger Balls that will have everyone asking for seconds!

Ingredients for Butterfinger Balls
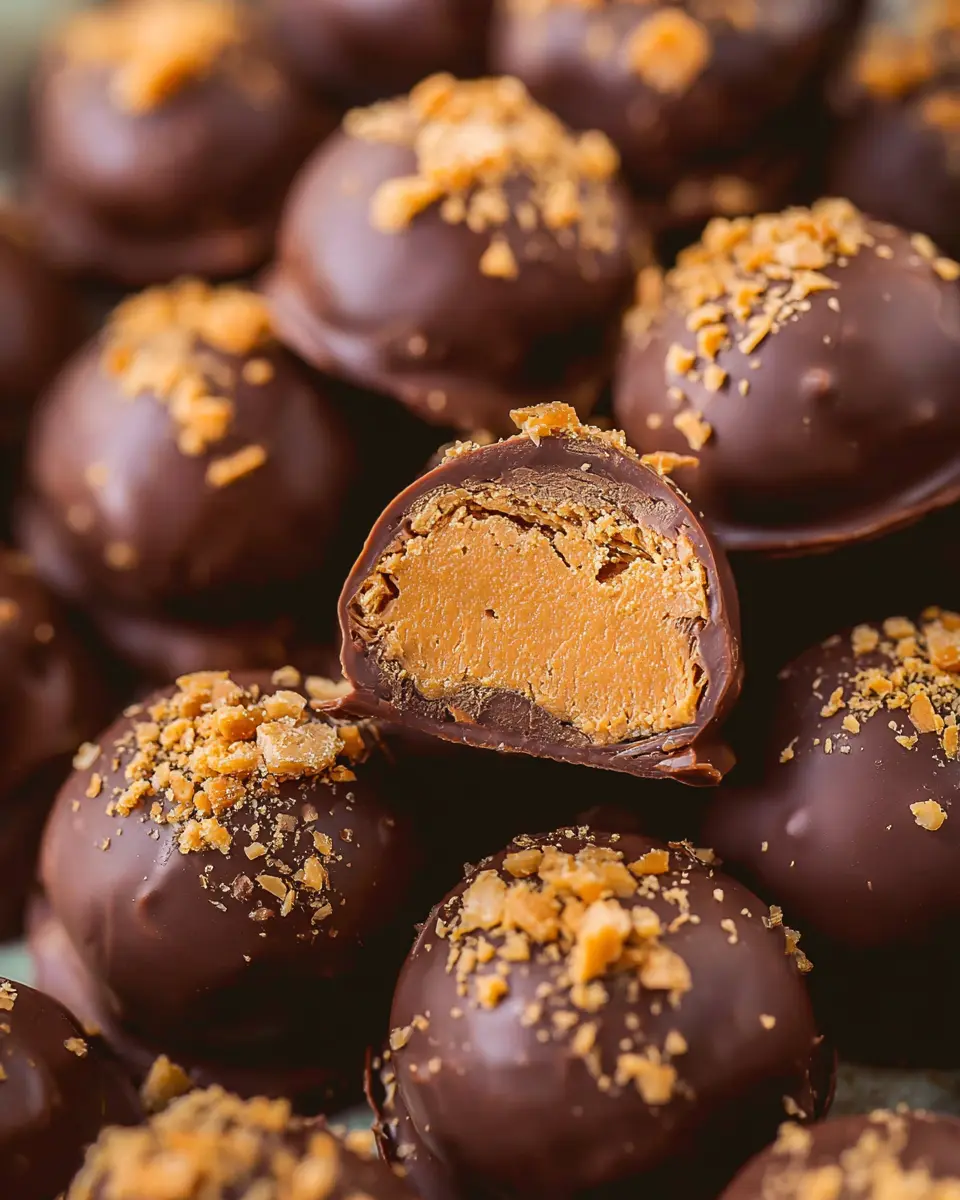
Creating delicious Butterfinger Balls is all about the right ingredients! This five-ingredient delight combines creamy peanut butter, buttery goodness, and sweet chocolate to create a treat that’s sure to impress.
Key Ingredients
-
Creamy Peanut Butter: 1⅓ cups of your favorite brand (I recommend Jif for the best flavor). Peanut butter provides that rich, nutty flavor that pairs perfectly with chocolate.
-
Salted Butter: ½ cup, softened. The salted butter adds a lovely richness and balances the sweetness of the candy.
-
Vanilla Extract: 1 teaspoon. A splash of vanilla enhances the overall flavor, making the filling even more irresistible.
-
Powdered Sugar: 2 cups. This is essential for achieving that classic Butterfinger sweetness!
-
Butterfinger Bits: 1½ cups, plus extra for topping (optional). These little crunchy morsels make every bite blissful.
-
Chocolate Melting Wafers: 3 cups, for dipping. These wafers create a smooth, decadent chocolate coating, elevating the dessert to a whole new level.
Armed with these ingredients, you're well on your way to mastering Butterfinger Balls that everyone will love! Happy baking!
Preparing Butterfinger Balls
Creating these delightful Butterfinger Balls is not just a delicious endeavor; it's also a fun kitchen project that'll impress your friends and satisfy your sweet tooth! Let's walk through the steps together.
Cream the base ingredients
First things first, gather your main ingredients: creamy peanut butter, salted butter, and vanilla extract. In a large mixing bowl or a stand mixer, combine 1⅓ cups of creamy peanut butter, ½ cup of softened salted butter, and 1 teaspoon of vanilla extract. Beat them together for about 30 seconds until you achieve a smooth and creamy texture. This combination serves as the heart of your Butterfinger Balls, so take your time ensuring it's well mixed. If you’re curious about the best peanut butter choices, many bakers swear by Jif for its ideal creaminess and flavor!
Incorporate the sweet elements
Once you have your creamy base ready, it’s time to add the sweetness. Gradually sift in 2 cups of powdered sugar to the mixture. Use a mixer or a sturdy spatula to beat everything together until it's smooth and well combined. Finally, fold in 1½ cups of Butterfinger Bits until they are evenly distributed. These little pieces not only enhance the flavor but add that signature crunch that makes every bite a treat. It’s like adding miniature Butterfinger bars into your creation!
Chill the mixture for easier handling
With your mixture complete, it's essential to let it chill. Why? Chilling helps the mixture firm up, making it easier to handle when you form the balls. Cover the bowl with plastic wrap and pop it into the refrigerator for about 30 minutes. During this time, you can clean up the kitchen or prepare your dipping chocolate (trust me, the wait will be worth it!).
Shape the balls with care
After letting the mixture chill, it’s time to shape your Butterfinger Balls. Line a cookie sheet with parchment paper for easy cleanup. Use a medium cookie scoop to portion out the mixture, rolling each one into a smooth ball. This will yield about 34 balls, depending on your scoop size. Once shaped, place them back on the cookie sheet and return them to the freezer for another 20 to 30 minutes. Chilling again helps them hold their shape when you dip them in chocolate.
Melt the chocolate and dip
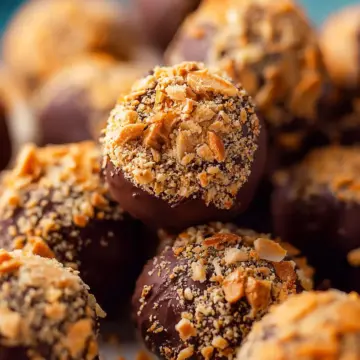
Just before you take the balls out of the freezer, let's focus on the chocolate! In a wide glass, melt 3 cups of chocolate melting wafers in 30-second intervals, stirring between each session until fully melted. Using a fork or a dipping tool, carefully dip each chilled ball into the melted chocolate, allowing the excess to drip off before placing them back on the parchment paper. To finish them off, sprinkle some extra Butterfinger Bits on top while the chocolate is still wet. Allow your delicious creations to set until the chocolate hardens.
And there you have it! With just a few simple steps, your Butterfinger Balls are ready to indulge. Enjoy the process and the rave reviews from your friends!

Variations on Butterfinger Balls
Peanut Butter-Free Butterfinger Balls
If you’re looking to enjoy Butterfinger Balls without the peanut butter, you’re in luck! Substitute the creamy peanut butter with sunflower seed butter for a nut-free option that doesn’t skimp on flavor. The rich, nutty taste pairs perfectly with the sweetness of the Butterfinger Bits. Just make sure to check for sunflower butter brands that use minimal additives for the best results.
Vegan Butterfinger Balls
For a dairy-free and egg-free treat, transform your Butterfinger Balls into a vegan delight! Use coconut oil instead of butter and a plant-based chocolate like Enjoy Life, which is perfect for melting. Swap in maple syrup or agave for a sweetener in place of powdered sugar to keep it vegan-friendly. Your friends won't believe these decadent bites are vegan, too!
For more tips on making vegan desserts, check out the Minimalist Baker.
Tips for Making Perfect Butterfinger Balls
Ensure Proper Chilling Time
The secret to achieving that perfect Butterfinger Balls texture lies in chilling! After combining your ingredients, let the mixture chill in the refrigerator for at least 30 minutes. This allows it to firm up, making it easier to shape into balls. Once you scoop and roll them, pop those delights into the freezer for an additional 20 to 30 minutes before dipping. This step is crucial; if they’re too soft, the chocolate coating will struggle to stay put.
Explore Different Chocolate Coatings
While melting chocolate wafers gives a lovely finish, why not have some fun with your coatings? Experiment with white chocolate or even colorful candy melts for a vibrant twist! You could also drizzle melted chocolate over the top for an eye-catching design. Feeling adventurous? Try adding a sprinkle of sea salt or crushed nuts on the chocolate, enhancing the texture and flavor. Each variation offers a unique twist on the classic Butterfinger Balls!
Serving suggestions for Butterfinger Balls
Perfect pairings for your Butterfinger Balls
Butterfinger Balls are deliciously sweet on their own, but why not elevate them with enticing pairings? These treats complement:
- Coffee or Espresso: The rich bitterness of coffee balances the sweetness of the Butterfinger Balls perfectly.
- Herbal Teas: Something like chamomile or peppermint can provide a gentle contrast.
- Milk or Nut Milk: A glass of cold milk adds creaminess that enhances the nutty flavors.
Each bite can be made even more enjoyable with these simple additions!
Gift ideas using Butterfinger Balls
Butterfinger Balls also shine as thoughtful gifts. Here are a few ideas:
- Homemade Gift Baskets: Arrange your Butterfinger Balls alongside other homemade treats like cookies and candies.
- Decorative Jars: Fill a mason jar with Butterfinger Balls, tie a pretty ribbon around it, and voilà—an adorable gift!
- Party Favors: Pack individual Butterfinger Balls in small, clear bags for a sweet takeaway at birthday parties or gatherings.
Customizing and presenting your treats creatively can make them an instant hit!
Time Details for Butterfinger Balls
Preparation Time
The Butterfinger Balls are quick to whip up, with just 30 minutes needed for preparation. Gather your ingredients and get ready to mix up that sweet, chocolatey filling!
Chill Time
After mixing, let the filling chill in the refrigerator for 1 hour. This step is essential for achieving the right texture when you roll your mixture into balls.
Total Time
From prep to delicious bites, the Butterfinger Balls will take about 1 hour and 30 minutes to complete. You’ll have a treat ready in no time that’s perfect for sharing (or keeping all to yourself)!
By following this easy time breakdown, you can budget your kitchen time effectively. Happy baking! If you’re curious about tips for making these treats even better, check out our favorite peanut butter alternatives for a unique twist.
Nutritional Information for Butterfinger Balls
Understanding the nutritional profile of Butterfinger Balls can help you enjoy these delectable treats without guilt. Here's a breakdown of what you're indulging in:
Calories
Each Butterfinger Ball packs approximately 150 calories. This makes it a rich but small indulgence, perfect for satisfying your sweet tooth!
Protein
With about 3 grams of protein per ball, these treats provide a little extra nourishment thanks to the peanut butter. It's a sweet way to get some protein in your day!
Sodium
At around 90 milligrams of sodium, Butterfinger Balls stay reasonable in terms of salt content. Just remember that moderation is key, especially if you're watching your sodium intake.
These delightful treats are not only easy to make but also provide a sweet balance of calories and protein. If you’re looking for more tips on making healthier desserts, check out resources from the American Heart Association for more insights!
FAQs about Butterfinger Balls
Can I use crunchy peanut butter instead of creamy?
Absolutely! While the recipe calls for creamy peanut butter to achieve a smooth consistency, using crunchy peanut butter can add a delightful texture. Just keep in mind that it may alter the final flavor slightly, enhancing that nutty taste. Experiment and see what you prefer!
How should I store leftover Butterfinger Balls?
To keep your delectable Butterfinger Balls fresh, store them in an airtight container in the refrigerator for up to 7 days. If you can resist eating them all at once, they won’t spoil quickly, but you'll want to enjoy them while they're at their best!
Can I freeze Butterfinger Balls for later enjoyment?
Yes, you can freeze these treats for up to 3 months! Just place them in a freezer-safe bag, and they'll be ready for a sweet surprise whenever a craving hits. When you're ready to indulge, let them thaw in the fridge or at room temperature for a few minutes!
Conclusion on Butterfinger Balls
Creating Butterfinger Balls is a delightful experience that brings together simplicity and indulgence. With just five ingredients, you can whip up a batch of these sweet treats that will impress friends and family. Perfect for gatherings, they’re a crowd-pleaser that disappear quickly. Enjoy and share the joy!
Butterfinger Balls
Equipment
- large bowl
- Stand Mixer
- cookie sheet
- parchment paper
- medium cookie scoop
- glass bowl
Ingredients
Butterfinger Ball Mixture
- 1⅓ cup creamy peanut butter Jif creamy peanut butter recommended
- ½ cup salted butter softened
- 1 teaspoon vanilla extract
- 2 cups powdered sugar
- 1½ cups Butterfinger Bits plus more for topping (optional)
- 3 cups chocolate melting wafers or chocolate chips with coconut oil
Instructions
Preparation
- Add the peanut butter, butter, and vanilla to a large bowl or stand mixer and cream together for 30 seconds.
- Sift the powdered sugar into the bowl and beat until smooth.
- Mix in the butterfinger bits until incorporated.
- Chill the mixture in the refrigerator for 30 minutes.
- Line a cookie sheet with parchment paper and portion the peanut butter mixture out with a medium cookie scoop and roll into balls. Place them on the cookie sheet and chill in the freezer for 20 to 30 minutes.
- Just before removing the balls from the freezer, melt the chocolate melting wafers in a wide glass on 30-second intervals, stirring between each, until fully melted.
- Use a fork or dipping tool to dip them in the melted chocolate then place them back on the parchment paper.
- Sprinkle the tops of the balls with Butterfinger Bits and allow them to set until the chocolate hardens.
Leave a Reply